Teaching Improvisation – 9 Steps to get your Students Improvising

This step-by-step guide is designed to help you introduce basic improvisation in your lessons and offers a structured framework that can be easily modified for pupils of all levels.
There is often a core belief amongst students that are new to improvisation that they should pick up their instrument and it ‘should just happen’; that musical ideas will spring forth easily, naturally, be perfectly articulated and be ‘innate’. Pitting their sounds against what might be heard from the improvisations of their favourite modern masters (think Wynton Marsalis, Ian Anderson, Anoushka Shankar) it is often the case that students experience ‘frustration’ and doubts about their ‘inability to improvise’ based on such comparisons.
However, frustrating first encounters with improvisation could be easily remedied with a simple change in approach. This would acknowledge that underneath all of that musical sense of ‘flow and ease’ from great improvisers are years of structured and methodical training to get to that musical point of seemingly innate freedom.
As Pablo Picasso said ‘Learn the rules like a pro, so you can break them like an artist’. An ethos that encourages artistic discipline as the path to creative freedom is not too dissimilar to how teaching improvisation might also be used. Here the key lies in offering students a structured framework with familiar melodic material as a starting point to eventually ‘branch out’, ‘break free’ and ‘jump from’ set frameworks in time.
How to begin
This step-by-step guide offers a structured approach specifically designed for students with a musical background based in notational learning methods. Equally, it is far from an approach that expects virtuosic improvisation to ‘just happen’. It allows the student to become familiar with both rhythmic and melodic improvisation in a gentle and pragmatic way. While this is not meant to be a comprehensive means to introduce all facets of the art, by the end of these nine exercises your student will be able to manipulate the rhythmic and melodic content of a repeated set sequence with both subdivision and pitch changes from inside and outside the given key.Please note: It might be the case that the student needs to quickly notate these exercises to have a ‘visual aid’ in the early stages. This should not be discouraged, if it is useful. Over time it is hoped that the student will be able to do these exercises ‘by ear’.
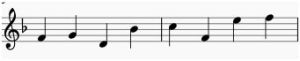
Example 1: Choose a scale and rhythmic sequence
Ask your student to play a familiar scale in an easily repeated rhythmic pattern over two bars. Here for ease of explanation, I have kept it simple with an ascending F major scale played over two common time bars of crotchets. In the case of an advanced student, the chosen sequence might consist of quavers, semiquavers, triplets, or even a mixed combination of these.
It might be that the rhythm your pupils chooses does not ‘line up’ evenly with a full scale– that’s ok. Simply have them keep repeating their chosen scale to make it ‘fit’. The overall idea here is that the rhythmic pattern combined with the scale sequence is not too complicated to continually repeat.

Example 2: Change one beat in each bar only
Ask your student to choose one beat in each bar to subdivide into smaller time values. The pitches will not change, only the rhythm. Repeat this a number of times, choosing different beats to subdivide.You will notice that a) the student will have to play with a steady sense of pulse to keep the rhythm intact while subdividing and b) have to learn to ‘keep track’ of where beats 1-4 are in each bar to know where the division of the two bars lie.

Example 3: Swap only one pitch in the scale for another
While keeping the original rhythmic pattern from Example 1 intact, the student will ‘swap’ one note of the scale for another note in the same scale. Have the student repeat this a number of times, choosing a different pitch to change each time. You will notice that the student will have to know the scale sequence comfortably in order to not lose their place when swapping notes around.

Example 4: Swap one pitch in each bar for another
While keeping the original rhythmic pattern from Example 1 intact, the student will swap notes in the scale similarly as was done in Example 3. This time though they will do this twice over the two bars instead (i.e. once in each bar). Again, have the student keep the rhythm intact and have them repeat this a number of times until they are comfortable keeping the melodic changes flowing. With practice can they swap more than two pitches?
Example 5: Combine rhythmic and melodic changes together
While keeping the original rhythmic pattern from Example 1 intact, have the student chose one note to subdivide rhythmically in each bar, as was done in Example 2. This time, also swap the pitch for that note, too.

Example 6: Swap one pitch in the scale for another outside the key
Have the student go back to both their original rhythmic pattern and scale sequence that they chose in Example 1. Using that same material again, have the student choose one note to add in the scale that is outside the given key signature.

Example 7: Swap one pitch in each bar for another outside the key
The same steps apply as in Example 6 but two notes outside the key are used instead. With practice can they do this swap more than twice in each bar?

Example 8: Combine rhythmic changes and non-scale pitches together
The same steps apply as in Example 7 but have the student also combine any non-scale pitches they use with rhythmic subdivision. With practice can they make these changes more than twice?

Example 9: Combine both rhythmic changes and swap pitches using those from both inside and outside the key
Ask your student to go back to both their original rhythmic pattern and scale sequence that they chose in Example 1. Using that same material again, have the student swap pitches in the melodic sequence to those that are both found inside and outside the key. This time, also use rhythmic subdivision to divide these chosen pitches into smaller time values, as in previous exercises.

The next steps:
As your students gain confidence, the exercises outlined in this method would easily transfer to simple tunes (i.e. Jingle Bells, Mary Had a Little Lamb, Hot Cross Buns, Baa-baa Black Sheep). Ideally the student would work their way through each of these steps again, using the given framework. Additionally, such practice fosters a ‘safety net’ for more radical exploration of tonality and rhythm in the future—all ingredients for building improvisational freedom for your students.Blog post written by: Dr. Jessica Quiñones, an American flautist, educator, performer and academic based in the UK. More of her writings on music performance can be found at www.JQflute.com/blog. She’s also found on Twitter and Instagram at @JQflute.